Building a cryptocurrency mining rig is an exciting venture for those looking to enter the crypto mining space. This step-by-step guide provides comprehensive instructions on selecting components, assembling both GPU and ASIC mining rigs, installing mining software, and finalizing your setup. Whether you’re a seasoned miner or a newcomer, this guide aims to equip you with the knowledge to construct a mining rig from scratch, enhancing your potential for profitability in the cryptocurrency mining industry.
Key Takeaways
- Understand the essential components for a mining rig, including the significance of selecting the right GPUs and using mining calculators for profitability estimates.
- Learn the assembly process for a GPU mining rig, focusing on the correct installation of the motherboard, CPUs, GPUs, and the importance of cooling.
- Discover the steps to construct an ASIC miner, including frame assembly, component positioning, and power supply connection.
- Gain insights into choosing compatible mining software, performing basic to advanced configurations for optimal mining performance.
- Complete your mining setup by creating a cryptocurrency wallet, joining a mining pool, and initiating the mining process with proper monitoring.
Selecting the Right Components for Your Mining Rig

Choosing the Appropriate GPUs
When venturing into the realm of crypto mining, selecting the right GPUs is a pivotal decision that can significantly impact your mining rig’s efficiency and profitability. GPUs, or Graphics Processing Units, are the workhorses of a mining rig, crunching numbers and performing complex calculations to mine cryptocurrencies.
It’s essential to consider both performance and energy consumption when choosing GPUs. High-performance GPUs can solve cryptographic puzzles faster, but they also consume more power. Balancing these factors is key to a successful mining operation. Here’s a list of popular GPUs for mining along with their estimated costs:
- NVIDIA RTX 3060 Ti: $399
- NVIDIA RTX 3080: Price varies
- AMD RX 5700 XT: Price varies
- AMD RX 580 8GB: Price varies
Remember, the return on investment (ROI) for each GPU is calculated by dividing the GPU purchase price by the net daily profit. This will help you gauge the time it will take to recoup your initial investment.
Selecting the right power supply and cooling solutions is crucial for efficient crypto mining rigs. Proper assembly, GPU selection, and maintenance are key for long-term success. Organizing the GPUs, motherboard, and power supply on the frame is important to avoid overheating and to facilitate future expansions.
Estimating Profitability with Mining Calculators
Before investing in a mining rig, it’s crucial to estimate its potential profitability. Mining calculators are indispensable tools for this purpose. They help you understand the return on investment by considering various factors such as electricity costs, hardware efficiency, and the current price of cryptocurrency.
Profitability is not static and can be influenced by fluctuating electricity prices, market volatility, and mining difficulty. It’s important to regularly reassess your mining operation’s profitability.
Here’s a simplified example of what a profitability calculation might look like:
| Factor | Description |
|---|---|
| Electricity Cost | The expense of power consumed by the mining rig |
| Hardware Efficiency | The hash rate per unit of power consumption |
| Crypto Price | The current market value of the mined cryptocurrency |
Remember, profitability calculators like NiceHash provide a snapshot of potential earnings, but they cannot predict future market conditions or changes in mining difficulty. Always use these tools as a guide rather than a guarantee.
Acquiring Essential Hardware and Accessories
Once you’ve chosen your GPUs and calculated the potential profitability, it’s time to acquire the essential hardware and accessories for your mining rig. Ensure that all components are compatible and can be delivered to your location.
- Hashboards
- Heatsinks
- Cooling fans
- Printed circuit boards (PCBs)
- RAM
- Power Supply Unit (PSU)
- Rig frame
- Data cables
- Ethernet cable
Remember, the infrastructure must support the power and connectivity requirements of your mining rig.
Hardware costs can be significant, and it’s important to factor in the need for potential upgrades over time to maintain mining efficiency. Assembling an ASIC miner is a complex task that requires careful planning and consideration of the steps involved.
Assembling the GPU Mining Rig

Preparing the Motherboard and Processor
The foundation of your mining rig is the motherboard and processor. Ensure the motherboard is placed on a non-conductive surface such as foam or an anti-static bag to prevent any electrical shorts. Follow these steps to prepare your motherboard and processor:
- Release the lever to open the CPU socket on the motherboard.
- Apply thermal paste to the processor or the heat sink as per the instructions.
- Carefully align the CPU with the socket, taking care not to bend any pins, and gently place it into position.
- Secure the heat sink or cooling fan on top of the CPU and connect its power cable to the designated pin on the motherboard.
It is crucial to handle the CPU with care. If your CPU has pins, avoid forcing them into the socket, which can cause damage. For pinless CPUs, alignment is key to proper installation.
When securing the motherboard to the frame, if the frame is metallic, use a non-conductive barrier like a wooden or plastic attachment. This ensures that the motherboard only makes contact with the frame at the screw holes. Tighten the screws firmly to stabilize the motherboard.
Installing the GPUs and Connecting Peripherals
Once you have the motherboard and processor ready, it’s time to install the GPUs. Start by plugging the PCI-e power connectors into one of the GPUs. This initial setup allows you to focus on one GPU at a time, ensuring a secure and correct installation. After the first GPU is set up, you can proceed to connect the additional GPUs.
Ensure that the monitor is connected to the graphics card in the main PCI-e slot on the motherboard. Also, connect your mouse and keyboard at this stage. It’s crucial to double-check all connections against the manual before powering on the rig. The power switch should be connected to the corresponding power pins on the motherboard.
Organizing the GPUs efficiently on the frame is vital to prevent overheating and to facilitate future expansions. Online forums and communities can be invaluable resources for support tailored to your specific hardware and mining configurations.
Here’s a checklist for connecting your GPUs and peripherals:
- Connect the first GPU with the PCI-e power connectors.
- Attach the monitor, mouse, and keyboard.
- Recheck all connections with the manual.
- Connect the power switch to the motherboard.
- Organize GPUs on the frame to allow for cooling and expansion.
Remember to use USB riser cards for each GPU, connecting them to the motherboard’s PCI-e x1 connectors. Depending on the riser model, you may need additional connectors such as PCI-e pin, SATA, or Molex to power the risers.
Ensuring Proper Cooling and Ventilation
Effective cooling is not just an add-on but a critical aspect of any mining rig’s operation. Ensure proper ventilation inside your mining setup to prevent overheating, which can lead to hardware failure and reduced efficiency. Position your mining rig in a location that allows for ample air circulation, such as a well-ventilated room or a dedicated space like a basement or garage.
To maintain optimal temperatures, consider the following cooling strategies:
- Monitor the temperature regularly to detect any abnormal increases.
- Install additional fans if necessary to improve air circulation within the rig.
- Experiment with power settings to achieve a balance between hash rate and heat generation.
- Stay updated with the latest firmware for your mining hardware to ensure it operates with maximum efficiency.
In warmer climates or when running at full capacity, external cooling solutions such as air conditioning units or specialized cooling systems may be required to manage the temperature effectively.
Remember, a cool miner is an efficient miner. By prioritizing cooling and ventilation, you can optimize your rig’s hash rate and longevity.
Setting Up the ASIC Miner

Assembling the Rig Frame and Attaching Components
The foundation of your ASIC miner is the rig frame, which serves as the skeleton to hold all the critical components in place. Start by creating or assembling your rig frame, ensuring it’s spacious enough to accommodate the hashboards, control board, cooling fans, and the power supply box. The rig frame can be a pre-made unit or a custom build tailored to your specific needs.
Once the frame is ready, proceed to secure the circuit board onto it. Most circuit boards are designed with openings for screws, allowing for a firm attachment to the frame. After the PCB is in place, use ASIC data cables to connect it to each of the hashboards. This step is crucial for the seamless operation of your mining rig.
Finally, the power supply box is the last component to be fitted onto the rig frame. It should be connected to the hashboards, the circuit board, and any additional cooling fans. Ensure that all connections are secure and that any excess cables are neatly managed to prevent any operational hazards.
Before diving into the assembly, confirm that all components are accessible and that your location can accommodate the connectivity and power requirements of an ASIC miner. This foresight can save you from unexpected challenges during the setup process.
Positioning the PCB and Hashboards
Once the hashboards are properly positioned, the next step is to attach the printed circuit board (PCB) to the rig frame. The PCB, serving as the miner’s brain, has designated openings for screws to secure it in place. After securing the PCB, it’s crucial to connect it to each hashboard using ASIC data cables, ensuring reliable communication between components.
The power supply unit (PSU) is the final piece to be installed on the rig frame. It’s imperative to establish connections not only to the hashboards and PCB but also to any additional cooling fans. To maintain optimal airflow and prevent overheating, any excess cables should be neatly tied off to the side.
The following table outlines the basic connections required for the PSU:
| Component | Connection Type |
|---|---|
| Hashboards | Direct Power |
| Printed Circuit Board (PCB) | Data & Power |
| Cooling Fans | Power |
Connecting the Power Supply Unit (PSU)
Once you have your motherboard and processor ready, the next step is to attach the Power Supply Unit (PSU) to your mining rig. The PSU is crucial as it supplies power to the entire setup. Ensure that the PSU is positioned close to the motherboard and connect it using the 24-pin (20+4) connector. This will power up the motherboard and is a critical step in the assembly process.
The PSU features several groups of power connectors, each designed for specific components of your mining rig. It’s essential to use the connectors appropriately:
- PCI-e connectors are for powering the GPUs.
- CPU connectors, as the name suggests, are for the CPU.
Pay close attention to the labels on the connectors to avoid mixing them up, as this could lead to hardware damage.
After connecting the PSU to the motherboard, proceed to plug the PCI-e power connectors into the GPU slotted in the main PCI-e slot. This initial setup allows you to connect a monitor, mouse, and keyboard, which is necessary for configuring the BIOS and installing the mining software. Before powering on the rig, double-check all connections against the manual to ensure everything is correctly installed.
Finally, when calculating the power requirements for your PSU, add approximately 100 watts to the total wattage of your GPUs to account for the motherboard, CPU, RAM, and storage. Multiply the Total Design Power (TDP) by 1.2 to determine the appropriate PSU rating. If necessary, multiple PSUs can be connected using 24-pin ATX PSU splitters to meet the power demands of your rig.
Installing and Configuring Mining Software

Selecting Software Compatible with Your Crypto
Once you’ve chosen the right hardware for your mining rig, the next critical step is to select the mining software that is compatible with the cryptocurrency you intend to mine. Mining software is essential for connecting your mining rig to the blockchain network and starting the mining process. There are numerous options available, each with its own set of features and supported currencies.
Before downloading and installing your chosen software, ensure that it supports the specific cryptocurrency you’re targeting. For example, CGMiner, developed in 2011, is one of the oldest and most versatile mining software options, supporting a variety of cryptocurrencies beyond Bitcoin, such as Dogecoin.
The right mining software will not only be user-friendly but also compatible with your operating system and mining hardware. Consider the cost and any mining pool requirements when making your choice.
Here are some factors to consider when selecting mining software:
- User-friendliness and ease of installation
- Compatibility with your operating system
- Support for the cryptocurrency you wish to mine
- Cost and any associated fees
- Requirements for joining mining pools
Remember, a stable power and internet connection are crucial for profitable crypto mining. Choose software that offers reliability and is prepared for any algorithm changes that may occur in the future.
Installation and Basic Configuration
Once you have selected the mining software that is compatible with your cryptocurrency, the next step is to install and configure it for basic operation. Installation procedures vary depending on the software, but generally follow a similar pattern. Here’s a simplified overview:
- Step 1: Download the mining software from the official website or repository.
- Step 2: Install the software on your mining rig, following the provided instructions.
- Step 3: Open the software and enter the necessary details such as your wallet address and mining pool information.
- Step 4: Adjust basic settings like the number of GPU threads to match your hardware configuration.
Remember, the goal is to optimize efficiency while maintaining stability. It’s crucial to start with a conservative setup and gradually fine-tune your system.
After completing these steps, your mining software should be up and running, ready to start the mining process. However, to truly maximize your mining rig’s performance, you’ll need to delve into advanced settings, which will be covered in the next section.
Advanced Settings for Optimal Performance
Once you’ve installed and configured your mining software, diving into advanced settings can significantly enhance your rig’s performance. By fine-tuning your system, you can achieve an optimal balance between hash rate and power consumption, which is crucial for efficient cryptocurrency mining.
For instance, in Windows 10, you can optimize your system by adjusting the notification settings, sleep mode, and visual effects. Specifically, turning off unnecessary notifications, setting sleep mode to ‘never’, and selecting ‘Adjust for best performance’ in the visual effects can all contribute to a more streamlined mining operation.
Remember, the goal is to maximize your hash rate while minimizing energy usage. Regular monitoring and adjustments are key to maintaining peak efficiency.
Here are some BIOS tweaks that can further optimize your mining rig:
- Set DMI Max Link Speed to Gen1 for stability.
- Disable non-essential SATA devices to reduce system load.
- Configure PCIe Speed to Gen1 to enhance compatibility.
- Disable HD Audio Controller to free up resources.
By implementing these advanced configurations, you can ensure that your mining rig operates at its full potential.
Finalizing Your Mining Setup

Creating a Cryptocurrency Wallet
Once you have your mining rig ready, the next crucial step is to set up a cryptocurrency wallet. This wallet will serve as a digital bank account where you can store, send, and receive your mined cryptocurrency. Here’s a simple guide to get you started:
- Choose a wallet that supports the cryptocurrency you plan to mine. There are many options available, each with different features and security measures.
- Download and install the wallet application from a trusted source, such as the App or Play Store.
- Follow the app’s instructions to create a new wallet. This will typically involve setting a strong password and possibly creating a backup seed phrase.
- Secure your wallet by writing down the seed phrase and storing it in a safe place. It’s the only way to recover your funds if you lose access to your wallet.
Remember, the security of your wallet is paramount. Treat it with the same care you would a physical wallet or bank account.
After setting up your wallet, you’ll need to enter its address into your mining software. This ensures that your mining rewards are deposited directly into your wallet.
Joining a Mining Pool for Increased Rewards
Joining a mining pool can significantly enhance your chances of earning cryptocurrency rewards. By combining your computational power with that of other miners, you can work together to solve the cryptographic challenges more efficiently. The rewards are then distributed among the pool members, typically based on the amount of processing power each miner has contributed.
Mining pools are essential for individual miners who lack the resources to mine solo. They provide a more stable and consistent revenue stream, mitigating the unpredictability of mining rewards.
Here’s a simple breakdown of the steps to join a mining pool:
- Research and select a reputable mining pool.
- Register an account with the pool.
- Configure your mining software with the pool’s server details.
- Start mining and receive your share of the rewards.
Remember, while mining pools do offer more frequent payouts, they also mean sharing the rewards. It’s important to consider the pool fees and the size of the pool as these factors can affect your overall profitability. Strategic planning and adaptation are crucial for profitability and decentralization.
Starting the Mining Process and Monitoring
Once your mining rig is assembled, and the software is installed, it’s time to start the mining process. Power up your rig and establish a connection to the blockchain network to begin validating transactions. This is where your rig will start solving complex mathematical problems to verify transactions and add them to the blockchain.
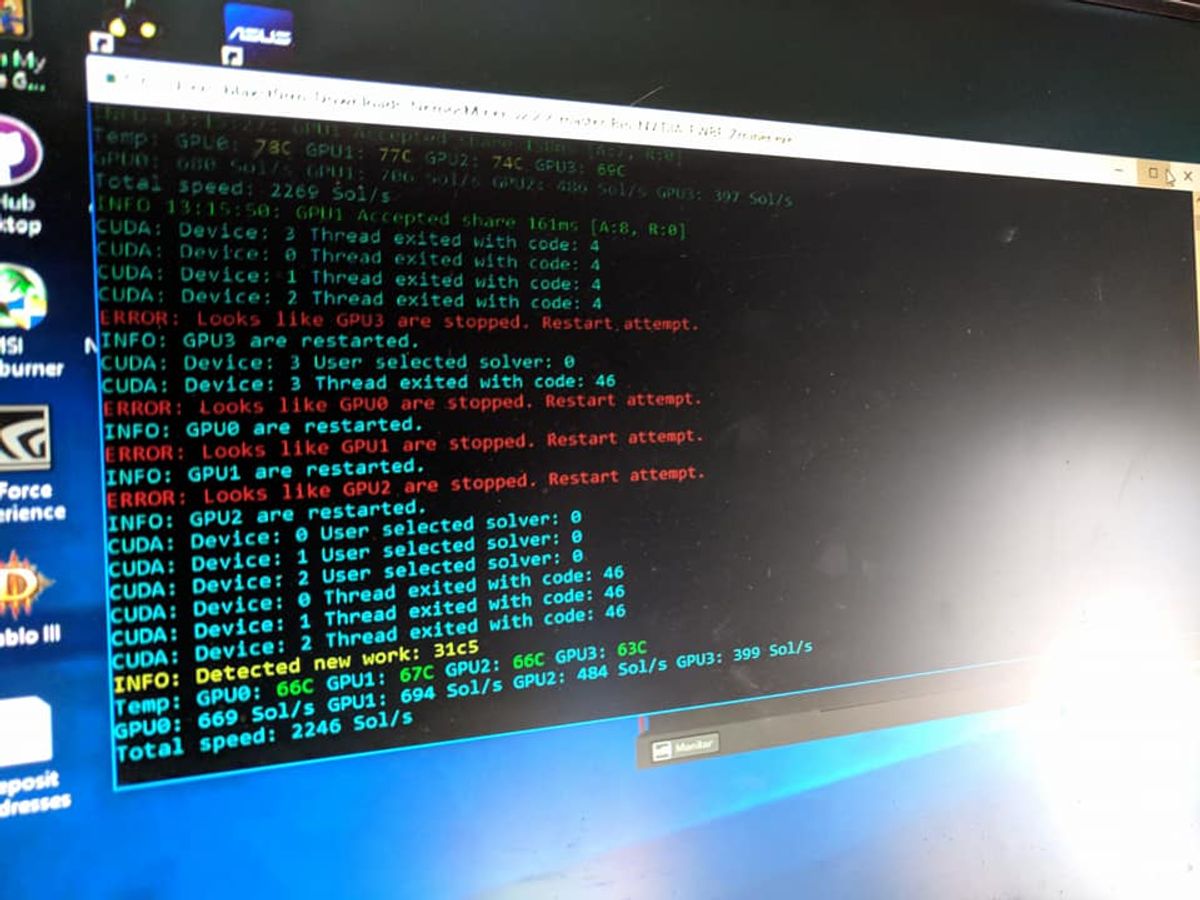
Consistent monitoring is crucial to ensure your mining rig operates efficiently. Keep an eye on the system’s performance, temperature, and any error messages that may indicate issues.
Here’s a simple checklist to help you monitor your mining rig effectively:
- Check the mining software’s dashboard for real-time statistics.
- Monitor the hash rate to ensure it’s stable and at expected levels.
- Keep track of the temperature to prevent overheating.
- Look out for any unusual activity that could signal hardware failure.
By staying vigilant and responsive to your rig’s performance, you can maximize uptime and potentially increase your cryptocurrency earnings.
Conclusion
In this comprehensive guide, we’ve walked you through the intricate process of assembling your own cryptocurrency mining rig. From selecting the right components to the final setup of mining software and joining a mining pool, we hope you now feel equipped to embark on this rewarding venture. Remember, building a mining rig is not just about putting together hardware; it’s about understanding the potential profitability and being part of the ever-evolving crypto community. We encourage you to utilize online resources, join forums for troubleshooting, and continuously educate yourself to optimize your mining rig’s performance. Happy mining!
Frequently Asked Questions
What components are essential for building a crypto mining rig?
Essential components for a crypto mining rig include GPUs or ASIC units, a motherboard, processor, RAM, power supply unit (PSU), cooling system, rig frame, and mining software.
How do I choose the right GPUs for my mining rig?
Choose GPUs based on hash rate, power consumption, and overall profitability. Use online mining calculators like Nicehash to estimate potential earnings and make an informed decision.
Can I assemble a mining rig with basic PC building skills?
Yes, basic PC building skills are sufficient to assemble a mining rig. You’ll need to install the GPUs on the motherboard, set up the cooling system, and connect all necessary peripherals.
What is the purpose of using a mining calculator?
A mining calculator helps estimate the potential profitability of your mining rig by considering factors such as hash rate, power consumption, and current cryptocurrency values.
Should I join a mining pool, and why?
Joining a mining pool is recommended as it increases your chances of earning rewards by pooling computational resources with other miners to improve overall hash rate and share the mining rewards.
What steps are involved in setting up mining software?
Setting up mining software involves selecting software compatible with your chosen cryptocurrency, installing it on your rig, configuring basic settings, and adjusting advanced settings for optimal performance.